javascript

bind() vs call() vs apply() in JavaScript: The little-known difference

Every developer should fully understand how they work and be able to discern the subtle differences between them.

So you know, JS functions are first-class citizens.

Which means: they’re all just object values — all instances of the Function class, with methods and properties.

So bind(), apply(), and call() are 3 essential methods every JavaScript function has.

Were you with me in the painful early days of React; when we still did this? 👇

This was just one of the multiple applications of bind() — a seriously underrated JavaScript method.

JavaScript
// damn class components are such a chore to write now import React from 'react'; class MyComponent extends React.Component { constructor(props) { super(props); } greet() { alert(`Hi, I'm ${this.props.name}!`); } // remember render()? render() { return ( <button onClick={this.greet.bind(this)}>Click me</button> ); } } export default MyComponent;

sayName() would be a mess without bind() — the alert() would never work.

Because internally React is doing something fishy with this method that completely screws up what this means inside it.

Before sayName would have had absolutely no problems showing the alert — just like in this other class:

JavaScript
class Person { props = { name: 'Tari' }; greet() { console.log(`Hi, I'm ${this.props.name}!`); } } const person = new Person(); person.greet();

But guess what React does to the greet event handler method behind the scenes?

It reassigns it to another variable:

JavaScript
class Person { props = { name: 'Tari' }; greet() { console.log(`Hi, I'm ${this.props.name}!`); } } // reassign to another variable: const greet = Person.prototype.greet; // ❌ bad idea greet();

So guess what happens to this — it’s nowhere to be found:

This is where bind comes to the rescue — it changes this to any instance object you choose:

So we’ve binded the function to the object — the bind target.

(I know it’s “bound” but let’s say binded just like how we say “indexes” for “index” instead of “indices”).

It’s immutable — it returns the binded function without changing anything about the original one.

And this lets us use it as many times as possible:

vs call()

There’s only a tiny difference between call and bind

bind creates the binded function for you to use as many times as you like.

But call? It creates a temporary binded function on the fly and calls it immediately:

JavaScript
class Person { constructor(props) { this.props = props; } greet() { console.log(`Hi, I'm ${this.props.name}`); } } const person = new Person({ name: 'Tari' }); const greet = Person.prototype.greet; greet.bind(person)(); greet.call(person);

So call() is basically bind() + a call.

But what about when the function has arguments? What do we do then?

No problem at all — just pass them as more arguments to call:

JavaScript
class Person { constructor(props) { this.props = props; } greet(name, favColor) { console.log( `Hi ${name}, I'm ${this.props.name} and I love ${favColor}` ); } } const person = new Person({ name: 'Tari' }); const greet = Person.prototype.greet; // bind(): normal argument passing to binded function greet.bind(person)('Mike', 'blue🔵'); // call(): pass as more arguments greet.call(person, 'Mike', 'blue🔵');

And you can actually do the same with bind():

JavaScript
// the same thing greet.bind(person)('Mike', 'blue🔵'); greet.bind(person, 'Mike', 'blue🔵')();

vs apply()

At first you may think apply() does the exact same thing as call():

JavaScript
class Person { constructor(props) { this.props = props; } greet() { console.log(`Hi, I'm ${this.props.name}`); } } const person = new Person({ name: 'Tari' }); const greet = Person.prototype.greet; greet.call(person); // Hi, I'm Tari greet.apply(person); // Hi, I'm Tari

But just like bind() vs call() there’s a subtle difference to be aware of:

Arguments passing:

JavaScript
class Person { constructor(props) { this.props = props; } greet(name, favColor) { console.log( `Hi ${name}, I'm ${this.props.name} and I love ${favColor}` ); } } const person = new Person({ name: 'Tari' }); const greet = Person.prototype.greet; //💡call() -- pass arguments with comma separated greet.call(person, 'Mike', 'blue🔵'); // Hi, I'm Tari //💡apply() -- pass arguments with array greet.apply(person, ['Mike', 'blue🔵']); // Hi, I'm Tari

One mnemonic trick I use to remember the difference:

  • call() is for commas
  • apply() is for arrays

Recap

  • bind() — bind to this and return a new function, reusable
  • call() — bind + call function, pass arguments with commas
  • apply() — bind + call function, pass arguments with array

NEW: Built-in TypeScript support in Node.js – Finally

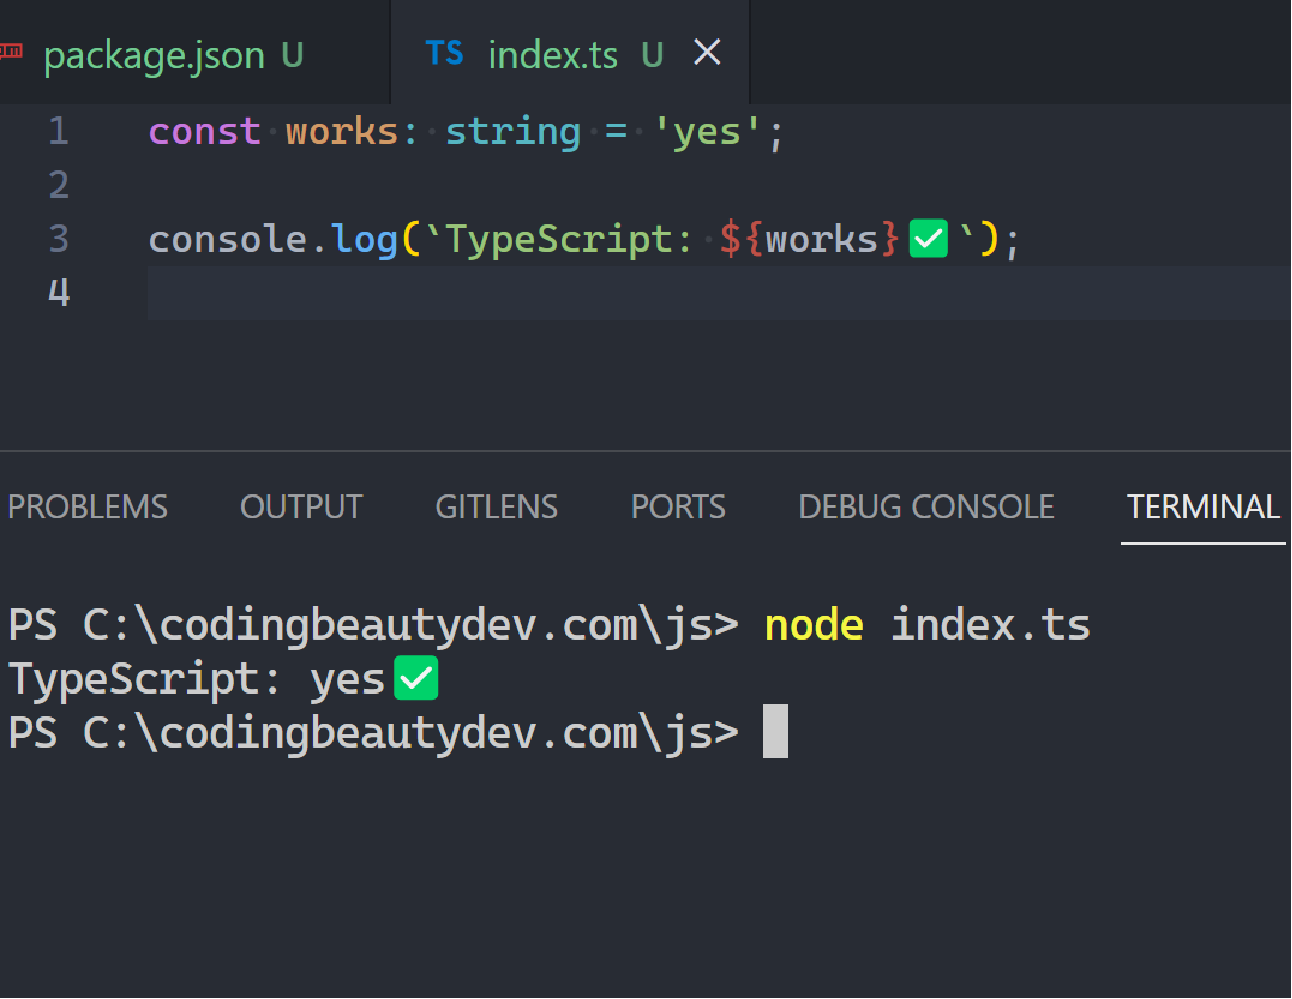
Exciting news today as native TypeScript support finally comes to Node.js!

Yes you can now use types natively in Node.js.

So throw typescript and ts-node in the garbage.

❌Before now:

Node.js only ever cared for JavaScript files.

This would never have run:

Try it and you’d get this unpleasant error:

Our best bet was to install TypeScript and compile with tsc.

And millions of developers agreed it was a pretty good option:

But this was painful — having to install the same old package and type out the same command over and over again.

Extra compilation step to JS and having to deal with TypeScript configurations and stuff.

Pretty frustrating — especially when we’re just doing a bit of testing.

That was why ts-node arrived to try to save the day — but it still wasn’t enough.

We could now run the TypeScript files directly:

We could even start an interactive session on the fly like we’d do with the standalone node command:

And everyone loved it:

But it was still an extra dependency, and we still had to install typescript.

We still had more subtle intricacies to be aware of, like how to use ts-node for ES modules with the --esm flag:

✅Now:

All this changes now with all the brand-new upgrades now in Node:

  • Native built-in TypeScript support.
  • Zero dependencies
  • Zero intermediate files and module configurations

Now all our favorite JS tools like Prettier, Next.js, and Webpack can have safer and intellisense-friendly config files.

Okay almost no one has Webpack in their favorite tools list but still…

Look we already have pull requests like this to support prettier.config.ts in Prettier — and they’re going to be taking big steps forward thanks to this new development.

How does it work behind the scenes?

Support for TypeScript will be gradual, so right now it only supports types — you can’t use more TypeScript-y features like enums (although who uses enums these days).

It uses the @swc/wasm-typescript tool to internally strip the TypeScript file of all its types.

So this:

JavaScript
const url: string = 'codingbeautydev.com'; const capitalized: string = url.toUpperCase(); console.log(`Capitalized: ${capitalized}`);

Turns into this:

JavaScript
const url = 'codingbeautydev.com'; const capitalized = url.toUpperCase(); console.log(`Capitalized: ${capitalized}`);

How to start using TypeScript in Node.js

Early beginnings like I said, so it’s still experimental and for now you’ll need the --experimental-strip-types flag:

JavaScript
node --experimental-strip-types my-file

This will be in an upcoming release.

Final thoughts

Built-in TypeScript is a serious power move to make Node.js a much more enjoyable platform for JS devs. I’ll definitely be using this.

Even though the support is not yet as seamless as in Bun or Deno, it makes a far-reaching impact on the entire JavaScript ecosystem as Node is still the most popular JS backend framework by light years.

10 must-have VS Code extensions for web development

Visual Studio Code has thousands of extensions you can install to ramp up your developer productivity and save you from mundane tasks.

They are all available in the Visual Studio marketplace and the vast majority of them are completely free.

Let’s have a detailed look at 10 powerful extensions that significantly improve the web development experience.

1. TODO Tree

Powerful extension for creating location-specific reminders of JavaScript code tasks you’ll need to get back to later:

Just use // TODO:

2. Prettier

Prettier is a pretty😏 useful tool that automatically formats your code using opinionated and customizable rules.

It ensures that all your code has a consistent format and can help enforce a specific styling convention in a collaborative project involving multiple developers.

The Prettier extension for Visual Studio Code.

The Prettier extension for Visual Studio Code brings about a seamless integration between the code editor and Prettier, allowing you to easily format code using a keyboard shortcut, or immediately after saving the file.

Watch Prettier in action:

Pretter instantly formats the code after the file is saved.

3. ESLint

ESLint is a tool that finds and fixes problems in your JavaScript code.

It deals with both code quality and coding style issues, helping to identify programming patterns that are likely to produce tricky bugs.

The ESLint extension for Visual Studio Code.

The ESLint extension for Visual Studio Code enables integration between ESLint and the code editor. This integration allows ESLint to notify you of problems right in the editor.

For instance, it can use a red wavy line to notify of errors:

ESLint uses a red wavy line to notify of errors.

We can view details on the error by hovering over the red line:

Viewing error details by hovering over the red wavy line.

We can also use the Problems tab to view all errors in every file in the current VS Code workspace.

Using the "Problems" tab to view all errors in every file in the VS Code workspace.

4. GitLens

GitLens is another powerful extension that helps you take full advantage of Git source control in Visual Studio Code.

GitLens displays views containing essential repository data and information on the current file, such as file history, commits, branches and remotes.

The GitLens extension displaying essential repository data.

Place the cursor on any line in the editor and GitLens will display info on the latest commit where the line was changed:

5. Live Server

The Live Server extension for VS Code starts a local server that serves pages using the contents of files in the workspace. The server will automatically reload when an associated file is changed.

The Live Server extension for Visual Studio Code.

In the demo below, a new server is launched quickly to display the contents of the index.html file. Modifying index.html and saving the file reloads the server instantly. This saves you from having to manually reload the page in the browser every time you make a change.

A demo of how to use the Live Server Extension for Visual Studio Code

As you saw in the demo, you can easily launch a new server using the Open with Live Server item in the right-click context menu for a file in the VS Code Explorer.

Launcing a new server with the "Open with Live Server" item in the right-click context menu for a file in the VS Code Explorer.

6. AI assistant extensions

GenAI has booming recently and now we have extensions that give you intelligent AI code completions as you type.

And IDE-integration chatbots, some of which use context from your codebase.

Great ones you can try:

  1. GitHub Copilot: paid, $10/month
  2. Coding Beauty Assistant: free, $10 per month for more features
  3. Tabnine: has free version, $12 per month

7. CSS classname intellisense extensions

Powerful bunch of extensions for working with CSS classes.

CSS Peek lets you quickly view the CSS style definitions for various class names and IDs assigned in HTML.

The CSS Peek extension for Visual Studio Code.

Just hold down Ctrl and hover over a class name or ID to quickly peek at its definition:

A demo of the three ways to use CSS Peek.

Intellisense for CSS Class Names in HTML works hand-in-hand with CSS Peek.

To provide code completion for the HTML class attribute from existing CSS definitions found in the current workspace.

You’ll appreciate the benefits of this extension when using third-party CSS libraries containing hundreds of classes.

And when you install Tailwind CSS IntelliSense, you get the power of CSS classname peek and auto-completion in Tailwind:

8. JavaScript (ES6) Code Snippets

As the name suggests, this is an extension that comes fully loaded with heaps of time-saving code snippets for JavaScript, in ES6 syntax.

JavaScript (ES6) Code Snippets Extension for Visual Studio Code.

Here’s a demo where the imp and imd snippets from this extension are used to quickly import two modules with ES6 syntax.

A demo of how to use the JavaScript (ES6) Code Snippets extension.

9. Visual Studio Intellicode

IntelliCode is another powerful AI tool that produces smart code completion recommendations that make sense in the current code context.

It does this using an AI model that has been trained on thousands of popular open-source projects on GitHub.

The Visual Studio Intellicode extension for Visual Studio Code.

When you type the . character to access an object method or fields, IntelliCode will suggest a list of members that are likely to be used in the present scenario. The items in the list are denoted using a star symbol, as shown in the following demo.

IntelliCode is available for JavaScript, TypeScript, Python, and several other languages.

10. VSCode Icons

Icon packs are available to customize the look of files of different types in Visual Studio Code. They enhance the look of the application and make it easier to identify and distinguish files of various sorts.

VSCode Icons is one the most popular icon pack extensions, boasting a highly comprehensive set of icons and over 11 million downloads.

vscode-icons extension for Visual Studio Code.

It goes beyond file extension differentiation, to provide distinct icons for files and folders with specific names, including package.json, node_modules and .prettierrc.

A select list of the icons provided by vscode-icons.

Final thoughts

These are 10 essential extensions that aid web development in Visual Studio Code. Install them now to boost your developer productivity and raise your quality of life as a web developer.

Stop using double negatives or nobody will understand your code

This is a big mistake many developers make that makes code cryptic and unreadable.

Don’t do this:

JavaScript
// ❌ Bad: negative name const isNotVisible = doStuff(); const isDisabled = doStuff(); const isNotActive = doStuff(); const hasNoAccess = doStuff(); // ❌ Double negation console.log(!isNotVisible); console.log(!isDisabled); console.log(!isNotActive); console.log(!hasNoAccess);

Double negatives like this makes it much harder to think about the logic and conditionals in your code.

It’s much better to name them positively:

JavaScript
// ✅ Good: positive name const isVisible = doStuff(); const isEnabled = doStuff(); const isActive = doStuff(); const hasAccess = doStuff(); // ✅ Clear and readable console.log(isVisible); console.log(isEnabled); console.log(isActive); console.log(hasAccess);

There is no indirection and your brain takes zero time to parse this.

Just imagine the pain of trying to understand this:

I didn’t not forget about not being unable to use the account.

Lol I couldn’t even understand it myself even though I made it up.

Compare to the far more natural way you’d expect from a sensible human:

I remembered that I could use the account.

Control flow negation

This is a more delicate form of double negation you need to know about:

JavaScript
const isAllowed = checkSomething(); // ❌ Bad if (!isAllowed) { handleError(); } else { // ❌ double negation! handleSuccess(); }

It’s double negation because we’re checking for the negative first.

So the else clause becomes a not of this negative.

Better:

JavaScript
const isAllowed = checkSomething(); // ✅ Fix: invert the if if (isAllowed) { handleSuccess() } else { handleError(); }

The same thing for equality checks:

JavaScript
// ❌ Double negation if (value !== 0) { doError(); } else { doSuccess(); } // ✅ Better if (value === 0) { doSuccess(); } else { doError(); }

Even when there’s no positive condition you can leave it blank — to keep the negative part in the else:

JavaScript
const hasAlreadyFetched = false; if (hasAlreadyFetched) { // nothing to do } else { doSomething(); }

This is great for expressions that are awkward to negate, like instanceof:

JavaScript
// ❌ Bad if (!(obj instanceof Person)) { doSomething(); } // ✅ if (obj instanceof Person) { } else { doSomething(); }

Exception: guard clauses

In guard clauses we deliberately deal with all the negatives first before the positive.

So we return early and avoid deeply nested ifs:

❌ Instead of this:

JavaScript
function sendMoney(account, amount) { if (account.balance > amount) { if (amount > 0) { if (account.sender === 'user-token') { account.balance -= amount; console.log('Transfer completed'); } else { console.log('Forbidden user'); } } else { console.log('Invalid transfer amount'); } } else { console.log('Insufficient funds'); } }

✅ We do this:

JavaScript
// ✅ Much cleaner function sendMoney(account, amount) { if (account.balance < amount) { console.log('Insufficient funds'); return; } if (amount <= 0) { console.log('Invalid transfer amount'); return; } if (account.sender !== 'user-token') { console.log('Forbidden user'); return; } account.balance -= amount; console.log('Transfer completed'); }

See, there’s no hard and fast rule. The end goal is readability: to make code as easy to understand in as little time as possible.

Flags always start out as false

Flags are boolean variables that control program flow.

A classic use case is running an action as long as the flag has a particular value:

JavaScript
let val = false; while (true); // do something that changes val if (val) { break; } }

In cases like this, always initialize the flag to false and wait for true.

Flags should always start out as false.

JavaScript
// ❌ waiting for true -> false let isRunning = true; while (true) { // processing... if (!isRunning) { break; } } // ✅ waiting for false -> true let hasStopped = false; while (true) { // processing... if (hasStopped) { break; } }

This makes so much sense when you understand flags to be a signal — that something is there.

Compound conditions

Negation also makes complex boolean expressions much harder to understand.

❌ Before:

JavaScript
if (!sleepy && !hungry) { console.log('time for gym👟'); } else { console.log('what to do now...'); // ❌ hard to understand when this runs }

This is where De Morgan’s Laws come in:

A powerful rule set for smoothly simplifying complex booleans and removing excessive negation:

JavaScript
let a: boolean; let b: boolean; !(a && b) === !a || !b; !(a || b) === !a && !b;

✅ So now:

JavaScript
if (!(sleepy || hungry)) { console.log('time for gym👟'); } else { console.log('what to do now...'); }

Now we can easily invert the logic as we did before:

JavaScript
if (sleepy || hungry) { console.log('what to do now...'); } else { console.log('time for gym👟'); }

It’s also structurally similar to the English in this way:

The first version was like:

(!a && !b)

It’s time for gym cause I’m not sleepy and I’m not hungry

After the refactor:

!(a || b):

It’s time for gym cause I’m not sleepy or hungry.

That’s how we’d typically say it.

Key points

  • Boolean variable names should be in the positive form. Exception: flags
  • Always check the positive case first in if-else statements. Exception: Guard clauses
  • Use De Morgan’s Laws to simplify negation in compound conditions.

How to console.log WITHOUT newlines in JavaScript

This is a little-known way to console log without newline that many developers have never used.

Let’s say we need to log in a loop like this:

JavaScript
for (let i = 1; i <= 5; i++) { // print number without newline } // Output: 1 2 3 4 5

❌ Unfortunately the normal way fails us:

So what do we do?

What we do: is process.stdout.write:

JavaScript
for (let i = 1; i <= 5; i++) { process.stdout.write(`${i} `); } // Output: 1 2 3 4 5

How is process.stdout.write different from console.log?

Well first of all, console.log IS process.stdout.write!

stdout is the fundamental way every CLI program logs output to the console.

That’s what it uses at its core:

JavaScript
Console.prototype.log = function() { this._stdout.write(util.format.apply(this, arguments) + '\n'); };

But this extra processing makes it so much better for formatting:

  • I can easily inspect objects with console.log without JSON.stringify:

But process.stdout.write fails miserably — it only accepts strings and Buffers:

But there’s something incredible only process.stdout.write can do:

Data streaming:

process.stdout is actually, a stream.

Streams represent data flow in Node.

  • Read streams — data coming from
  • Write streams — data going into
  • Duplex streams — both

Data’s flowing from the file read stream into the stdout stream.

It’s the same as this:

JavaScript
import fs from 'fs'; fs.createReadStream('codingbeautydev.txt').on( 'data', (chunk) => { process.stdout.write(chunk); } );

But pipe is much more natural for stream-to-stream data flow:

Letting you create powerful transformation pipelines like this:

JavaScript
import fs from 'fs'; import { Transform } from 'stream'; // ✅ duplex stream const uppercase = new Transform({ transform(chunk, encoding, callback) { callback(null, chunk.toString().toUpperCase()); }, }); fs.createReadStream('codingbeautydev.txt') .pipe(uppercase) .pipe(process.stdout);

process.stdin

process.stdin is the process.stdout‘s input counterpart — a readable stream for user input.

So see how with a single line I create a pipeline to reflect all my input to me:

JavaScript
process.stdin.pipe(process.stdout);

And when I insert the uppercase transformation into the pipeline:

JavaScript
import fs from 'fs'; import { Transform } from 'stream'; // ✅ duplex stream const uppercase = new Transform({ transform(chunk, encoding, callback) { callback(null, chunk.toString().toUpperCase()); }, }); process.stdin.pipe(uppercase).pipe(process.stdout);

process.stderr

Here to complete the standard stream trio.

  • console.logprocess.stdin
  • console.errorprocess.stderr

Probably also defined this way in Node:

JavaScript
Console.prototype.error = function() { this._stderr.write(util.format.apply(this, arguments) + '\n'); };
JavaScript
console.log('A normal log message'); console.error('An error message');

You can see the difference in the browser:

Although not much difference on Node:

These are 3 powerful streams that let you input, process, and output data creatively and intuitively.

10 one-liners that change how you think about JavaScript

Here’s something most JavaScript developers don’t know:

You can shorten any piece of code into a single line.

With one-liners I went from 17 imperative lines:

JavaScript
// ❌ 17 lines function extractRedirects(str) { let lines = str.split('\n'); let sourceDestinationList = []; for (let line of lines) { let sourceDestination = line.split(' '); let source = sourceDestination[2]; let destination = sourceDestination[3]; let redirectObj = { source: source, destination: destination, permanent: true, }; sourceDestinationList.push(redirectObj); } return sourceDestinationList; }

To a single functional statement:

JavaScript
// ✅ 1 line -- formatted const extractRedirects = (str) => str .split('\n') .map((line) => line.split(' ')) .map(([, , source, destination]) => ({ source, destination, permanent: true, }));

The second is so much cleaner and elegant — you can clearly see how the data beautifully flows from input to output with no breaks.

Let’s look at 10 unconventional JS one-liners that push you to the limits of what’s possible with JavaScript.

1. Shuffle array

What do you make of this:

JavaScript
// ✅ Standard Fisher-Yates shuffle, functional version const shuffleArray = (arr) => [...Array(arr.length)] .map((_, i) => Math.floor(Math.random() * (i + 1))) .reduce( (shuffled, r, i) => shuffled.map((num, j) => j === i ? shuffled[r] : j === r ? shuffled[i] : num ), arr ); // [ 2, 4, 1, 3, 5 ] (varies) console.log(shuffleArray([1, 2, 3, 4, 5]));

The most complex thing for me was figuring out the immutable no-variable version of the swap — and reduce() has a way of making your head spin.

Then there’s this too:

JavaScript
const shuffleArray = (arr) => arr.sort(() => Math.random() - 0.5); const arr = [1, 2, 3, 4, 5]; console.log(shuffleArray(arr));

I see it everywhere but it’s terrible for getting a truly uniform distribution.

2. Reverse string

❌ 8 lines:

JavaScript
const reverseString = (str) => { let reversed = ''; for (let i = str.length - 1; i >= 0; i--) { const ch = str[i]; reversed += ch; } return reversed; }; const reverse = reverseString('Indestructible!'); console.log(reverse); // !elbitcurtsednI

✅ 1 line:

JavaScript
const reverseString = (str) => str.split('').reverse().join(''); const reverse = reverseString('Indestructible!'); console.log(reverse); // !elbitcurtsednI

3. Group array by ID

Grouping arrays by a specific object property:

JavaScript
const groupBy = (arr, groupFn) => arr.reduce( (grouped, obj) => ({ ...grouped, [groupFn(obj)]: [ ...(grouped[groupFn(obj)] || []), obj, ], }), {} ); const fruits = [ { name: 'pineapple🍍', color: '🟡' }, { name: 'apple🍎', color: '🔴' }, { name: 'banana🍌', color: '🟡' }, { name: 'strawberry🍓', color: '🔴' }, ]; const groupedByNameLength = groupBy( fruits, (fruit) => fruit.color ); console.log(groupedByNameLength);

4. Generate random UUID

So many language concepts working together here:

JavaScript
const generateRandomUUID = (a) => a ? (a ^ ((Math.random() * 16) >> (a / 4))).toString(16) : ([1e7] + -1e3 + -4e3 + -8e3 + -1e11).replace( /[018]/g, generateRandomUUID ); console.log(generateRandomUUID()); // f138f635-acbd-4f78-9be5-ca3198c4cf34 console.log(generateRandomUUID()); // 8935bb0d-6503-441f-bb25-7bc685b5b5bc

There’s basic arithmetic, powers, random values, methods, bit-shifting, regexes, callback functions, recursion, exponentiation… it’s perfection.

5. Generate random hex color

1 line to generate a random hex color:

JavaScript
const randomHexColor = () => `#${Math.random().toString(16).slice(2, 8).padEnd(6, '0')}`; console.log(randomHexColor()); // #7a10ba (varies) console.log(randomHexColor()); // #65abdc (varies)

6. Array equality

Check array equality with a one-liner…

❌ 11 lines:

JavaScript
const areEqual = (arr1, arr2) => { if (arr1.length === arr2.length) { for (const num of arr1) { if (!arr2.includes(num)) { return false; } } return true; } return false; };

✅ 1 line:

JavaScript
const areEqual = (arr1, arr2) => arr1.sort().join(',') === arr2.sort().join(',');

Or✅:

JavaScript
// For more complex objects // and sort() will probably have a defined callback const areEqual = (arr1, arr2) => JSON.stringify(arr1.sort()) === JSON.stringify(arr2.sort());

7. Remove duplicates from array

Shortest way to remove duplicates from an array?

❌ 9 lines:

JavaScript
const removeDuplicates = (arr) => { const result = []; for (const num of arr) { if (!result.includes(num)) { result.push(num); } } return result; }; const arr = [1, 2, 3, 4, 5, 3, 1, 2, 5]; const distinct = removeDuplicates(arr); console.log(distinct); // [1, 2, 3, 4, 5]

✅ 1 line:

JavaScript
const arr = [1, 2, 3, 4, 5, 3, 1, 2, 5]; const distinct = [...new Set(arr)]; console.log(distinct); // [1, 2, 3, 4, 5]

This used to be like the only reason anyone ever cared for Sets — until we got these 7 amazing new methods.

8. Validate email

Email validation one-liners are all about that regex:

JavaScript
const isValidEmail = (email) => /^[\w-]+(\.[\w-]+)*@([\w-]+\.)+[a-zA-Z]{2,7}$/.test( email ); console.log(isValidEmail('hi@wp.codingbeautydev.com')); // true console.log(isValidEmail('hi@codingbeautydev.123')); // false console.log(isValidEmail('wp.codingbeautydev.com')); // false console.log(isValidEmail('hi@')); // false console.log(isValidEmail('hi@codingbeautydev&12')); // false

But I’ve seen monstrosities like this (more comprehensive):

JavaScript
const isValidEmail = (email) => /^(([^<>()[\]\\.,;:\s@\"]+(\.[^<>()[\]\\.,;:\s@\"]+)*)|(\".+\"))@((\[[0-9]{1,3}\.[0-9]{1,3}\.[0-9]{1,3}\.[0-9]{1,3}\])|(([a-zA-Z\-0-9]+\.)+[a-zA-Z]{2,}))$/.test( email ); console.log(isValidEmail('hi@wp.codingbeautydev.com')); // true console.log(isValidEmail('hi@codingbeautydev.123')); // false console.log(isValidEmail('wp.codingbeautydev.com')); // false console.log(isValidEmail('hi@')); // false console.log(isValidEmail('hi@codingbeautydev&12')); // false

And even these (most comprehensive) — can you even see it:

JavaScript
const isValidEmail = (email) => /(?:[a-z0-9!#$%&'*+/=?^_`{|}~-]+(?:\.[a-z0-9!#$%&'*+/=?^_`{|}~-]+)*|"(?:[\x01-\x08\x0b\x0c\x0e-\x1f\x21\x23-\x5b\x5d-\x7f]|\\[\x01-\x09\x0b\x0c\x0e-\x7f])*")@(?:(?:[a-z0-9](?:[a-z0-9-]*[a-z0-9])?\.)+[a-z0-9](?:[a-z0-9-]*[a-z0-9])?|\[(?:(?:25[0-5]|2[0-4][0-9]|[01]?[0-9][0-9]?)\.){3}(?:25[0-5]|2[0-4][0-9]|[01]?[0-9][0-9]?|[a-z0-9-]*[a-z0-9]:(?:[\x01-\x08\x0b\x0c\x0e-\x1f\x21-\x5a\x53-\x7f]|\\[\x01-\x09\x0b\x0c\x0e-\x7f])+)\])/.test( email ); console.log(isValidEmail('hi@wp.codingbeautydev.com')); // true console.log(isValidEmail('hi@codingbeautydev.123')); // false console.log(isValidEmail('wp.codingbeautydev.com')); // false console.log(isValidEmail('hi@')); // false console.log(isValidEmail('hi@codingbeautydev&12')); // false

It’s probably about being as thorough as possible – let’s say the 1st one catches like 95% of wrong emails, then the 2nd like 99%.

The last one here is actually the official RFC 2822 standard for validating emails – so we’re looking at 100% coverage.

9. Convert JSON to Maps

JavaScript
const jsonToMap = (json) => new Map(Object.entries(JSON.parse(json))); const json = '{"user1":"John","user2":"Kate","user3":"Peter"}'; const map = jsonToMap(json); // Kate console.log(map.get('user2')); // Map(3) { 'user1' => 'John', 'user2' => 'Kate', 'user3' => 'Peter' } console.log(map);

10. Convert snake to camel case

Easily convert from snake casing to camel casing with zero temporary variables.

JavaScript
const snakeToCamelCase = (s) => s .toLowerCase() .replace(/(_\w)/g, (w) => w.toUpperCase().substr(1)); const str1 = 'passion_growth'; const str2 = 'coding_beauty'; console.log(snakeToCamelCase(str1)); // passionGrowth console.log(snakeToCamelCase(str2)); // codingBeauty

Final thoughts

Countless operations jam-packed into a single statement; A race from input start to output finish with no breaks, a free flow of high-level processing. A testament of coding ability and mastery.

This is the power and beauty of JavaScript one-liners.

The 5 most transformative JavaScript features from ES13

ES13 was packed with valuable features that completely transformed the way we write JavaScript.

Code became cleaner, shorter, and easier to write.

Let’s check them out and see the ones you missed.

1. Top-level await

With ES13 we were finally able to use await in the global scope!

❌ Before ES13:

JavaScript
// ❌ Syntax error: await is only valid in async functions await setTimeoutAsync(3000); function setTimeoutAsync(timeout) { return new Promise((resolve) => { setTimeout(() => { resolve('codingbeautydev.com'); }, timeout); }); }

We always had to put it in an async function or create an async IIFE:

JavaScript
// async IIFE (async () => { await setTimeoutAsync(3000); })(); // à la C++ async function main() { await setTimeoutAsync(3000); }

✅ After ES13:

JavaScript
// ✅ Waits for timeout - no error thrown await setTimeoutAsync(3000); function setTimeoutAsync(timeout) { return new Promise((resolve) => { setTimeout(() => { resolve('codingbeautydev.com'); }, timeout); }); }

2. Class declaration upgrades

Class field declarations

Before ES13 we could only declare class fields in the constructor!

Unlike in many other languages we could not declare or define them in the outermost scope of the class.

❌ Before:

JavaScript
class Site { constructor() { // ❌ wouldn't work outside this.url = 'codingbeautydev.com'; this.color = '🔵blue'; } } const site = new Site(); console.log(site.url); // codingbeautydev.com console.log(color); // blue

✅ Now with ES13:

Just like in TypeScript:

JavaScript
class Site { // ✅ no constructor needed url = 'codingbeautydev.com'; color = '🔵blue'; } const site = new Site(); console.log(site.url); // codingbeautydev.com console.log(color); // 🔵blue

Private methods and fields

Creating private methods was impossible before ES13.

We also had to the ugly underscore hack to indicate privacy — but that was just an indication.

❌ Before:

JavaScript
class Person { _firstName = 'Tari'; _lastName = 'Ibaba'; get name() { return `${this._firstName} ${this._lastName}`; } } const person = new Person(); console.log(person.name); // Tari Ibaba // We can still access private members! console.log(person._firstName); // Tari console.log(person._lastName); // Ibaba // They can also be modified person._firstName = 'Lionel'; person._lastName = 'Messi'; console.log(person.name); // Lionel Messi

✅ Now after ES13:

We can add private fields and members to a class by prefixing it with a hashtag (#):

You’ll get a syntax error if you try to access it from outside the class:

JavaScript
class Person { #firstName = 'Tari'; #lastName = 'Ibaba'; get name() { return `${this.#firstName} ${this.#lastName}`; } } const person = new Person(); console.log(person.name); // SyntaxError: Private field '#firstName' must be // declared in an enclosing class console.log(person.#firstName); console.log(person.#lastName);

We can see something interesting from the error message:

The compiler doesn’t expect you to even try to access private fields from outside the class — it assumes you’re trying to creating one.

Static class fields and static private methods

Static fields — properties of the class itself rather than any specific instance.

Ever since ES13 we can now easily create them for any class:

JavaScript
class Person { static #count = 0; static eyeCount = 2; static getCount() { // Access fellow static member with this return this.#count; } // instance member constructor() { // Access static member with this.constructor this.constructor.#incrementCount(); } static #incrementCount() { this.#count++; } } const person1 = new Person(); const person2 = new Person(); console.log(Person.getCount()); // 2

3. Array upgrades: new at() method

So usually we’d use square brackets ([]) to access the Nth of the array.

JavaScript
const arr = ['a', 'b', 'c', 'd']; console.log(arr[1]); // b

But accessing the Nth item from the end was always a pain — we had to index with arr.length - N:

❌ Before ES13:

JavaScript
const arr = ['a', 'b', 'c', 'd']; // 1st element from the end console.log(arr[arr.length - 1]); // d // 2nd element from the end console.log(arr[arr.length - 2]); // c

Luckily ES13 brought a new at() method that solved all that:

JavaScript
const str = 'Coding Beauty'; console.log(str.at(-1)); // y console.log(str.at(-2)); // t

4. Static class blocks

With static fields came static blocks.

To execute code only once, at the creation of the class — just like static constructors in OOP languages like C# and Java.

So you can create as many of them as you want in the class — all the code will run in the order you defined them:

JavaScript
class Vehicle { static defaultColor = 'blue'; } class Car extends Vehicle { static colors = []; static { this.colors.push(super.defaultColor, 'red'); } static { this.colors.push('green'); } } console.log(Car.colors); // [ 'blue', 'red', 'green' ]

5. Error reporting upgrades

So sometimes we catch errors of methods down the call stack only to rethrow it back up the stack.

But when we do this we lose crucial information from the original error:

JavaScript
try { userAction(); } catch (err) { // ❌ doesn't know fundamental cause of error console.log(err); } function userAction() { try { apiCallThatCanThrow(); } catch (err) { // 👇 rethrow throw new Error('New error message'); } } function apiCallThatCanThrow() { console.log('fetching from codingbeautydev.com...'); throw new Error('throwing for no reason'); }

That was why ES13 introduce a new cause property to preserve this important info and make debugging easier:

JavaScript
try { userAction(); } catch (err) { // ✅ now knows what caused the error console.log(err); console.log(`Cause by: ${err.cause}`); } function userAction() { try { apiCallThatCanThrow(); } catch (err) { // ✅ error cause throw new Error('New error message', { cause: err }); } } function apiCallThatCanThrow() { console.log('fetching from codingbeautydev.com...'); throw new Error('throwing for no reason'); }

Final thoughts

Overall ES13 was a significant leap for JavaScript with several features that have become essential for modern development.

Empowering you to write cleaner code with greater conciseness, expressiveness, and clarity.

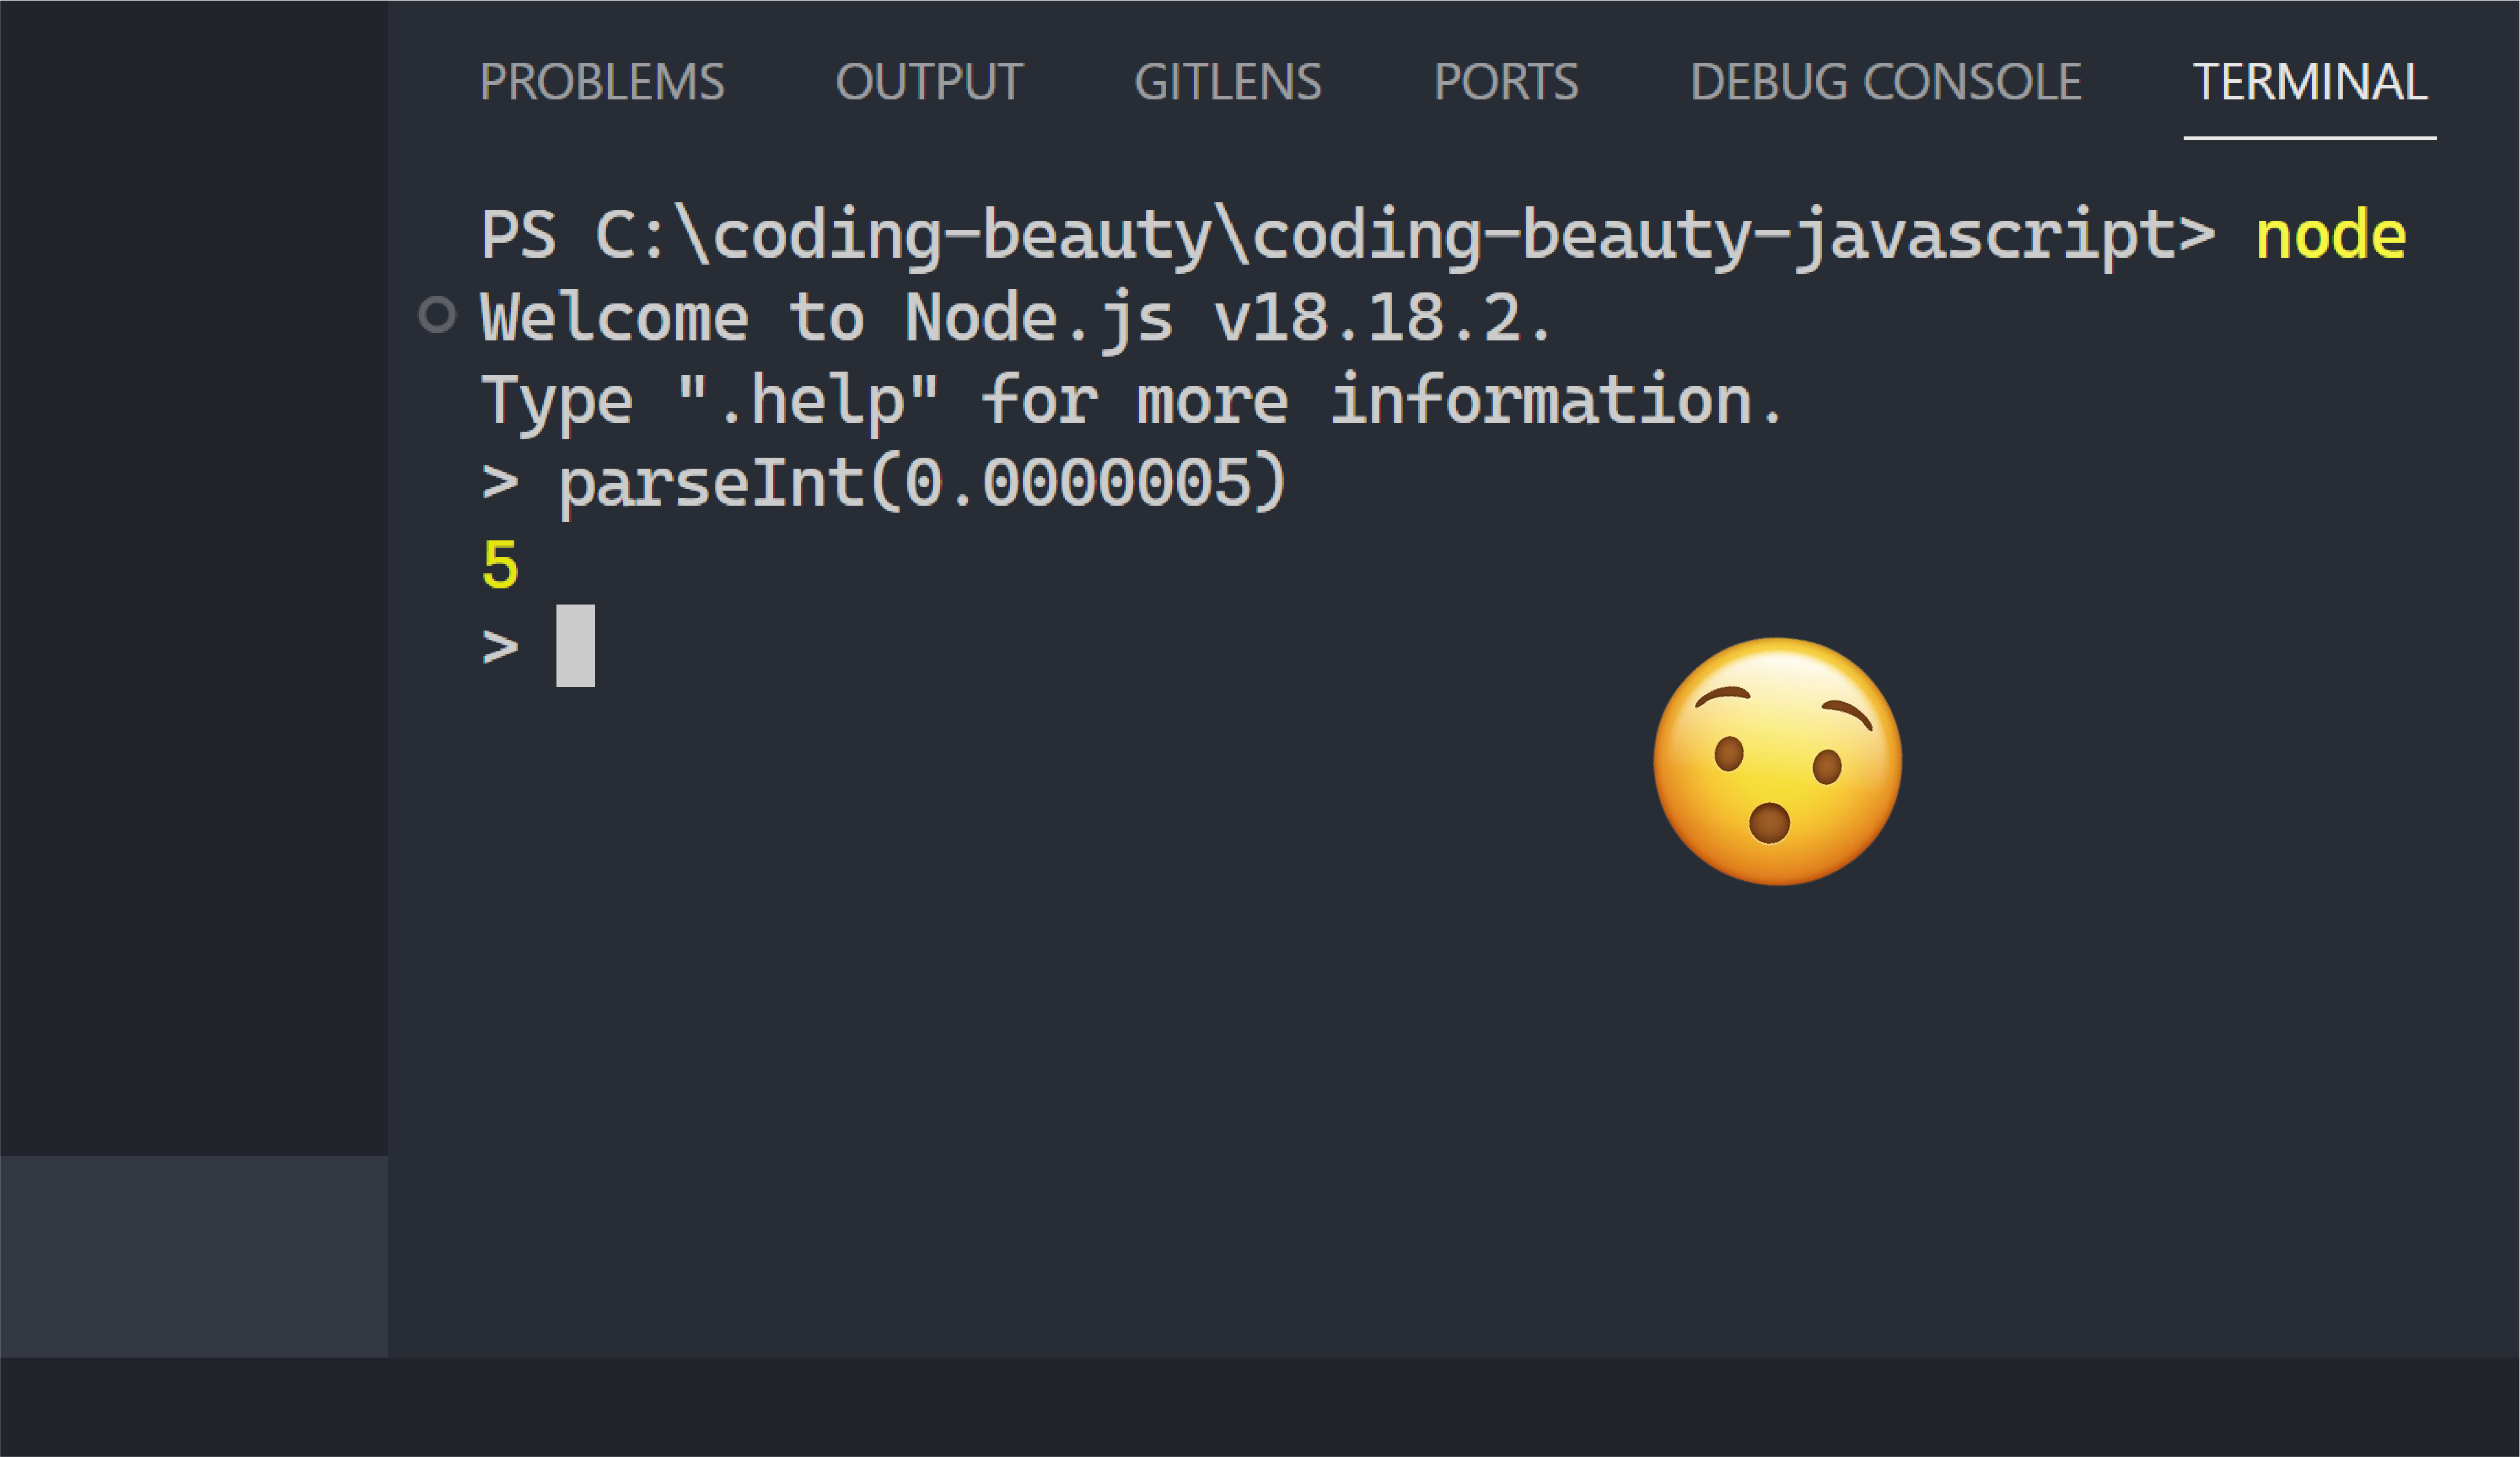
Why parseInt(0.0000005) returns 5 in JavaScript

An interesting occurrence showing the sheer weirdness of JavaScript:

Just when you thought you knew everything about parseInt:

The funny thing is it returns 0 for four and five zeroes after the decimal point.

But just add one more zero and it starts acting crazy?

The difference from Number is even more stark.

parseInt vs Number — four and five zeroes:

But:

parseInt vs Number — six zeroes:

But we figure it out eventually.

parseInt: The missing parts

By understanding how the parseInt function work:

It takes two arguments: the string and the base or radix.

JavaScript
parseInt(string) parseInt(string, radix)

Look what it does for 6 zeroes when it’s a string:

JavaScript
parseInt('0.5') // 0 parseInt('0.05') // 0 parseInt('0.005') // 0 parseInt('0.0005') // 0 parseInt('0.00005') // 0 parseInt('0.000005') // 0 // 6 parseInt('0.0000005') // 0 parseInt('015') // 15 parseInt('015', 8) // 13

But for Number:

JavaScript
Number('0.5') // 0.5 Number('0.05') // 0.05 Number('0.005') // 0.005 Number('0.0005') // 0.0005 Number('0.00005') // 0.00005 Number('0.000005') // 0.000005 // 6 ! Number('0.0000005') // 0.0000005 Number('015') // 15

But what happens when it’s a number?

A number like 0.0000005?

Step 1: Convert the number to a string

Number gets coerced to a string!

So look what parseInt does to 0.0000005:

JavaScript
String(0.5); // => '0.5' String(0.05); // => '0.05' String(0.005); // => '0.005' String(0.0005); // => '0.0005' String(0.00005); // => '0.00005' String(0.000005); // => '0.000005' String(0.0000005); // => '5e-7' 👈 this is important

Step 2: Do the actual rounding

So:

parseInt(0.0000005) parseInt('5e-7')

And now see what happens for '5e-7' for parseInt:

Why?

Because of how parseInt works: It interprets only the leading portion of the string as an integer value.

It doesn’t recognize e, so it ignores it and everything onwards.

This is same reason why:

  1. parseInt(999999999999999999999) parseInt(1e+21) 1
  2. parseInt(0.0000007) parseInt(7) 7

So Number is your best bet if you wanna avoid surprises when converting a string to a number

And if you need just the integer part, Math.floor() is here for you:

JavaScript
Math.floor(0.5); // 0 Math.floor(0.05); // 0 Math.floor(0.005); // 0 Math.floor(0.0005); // 0 Math.floor(0.00005); // 0 Math.floor(0.000005); // 0 Math.floor(0.0000005); // 0 ✅ perfect

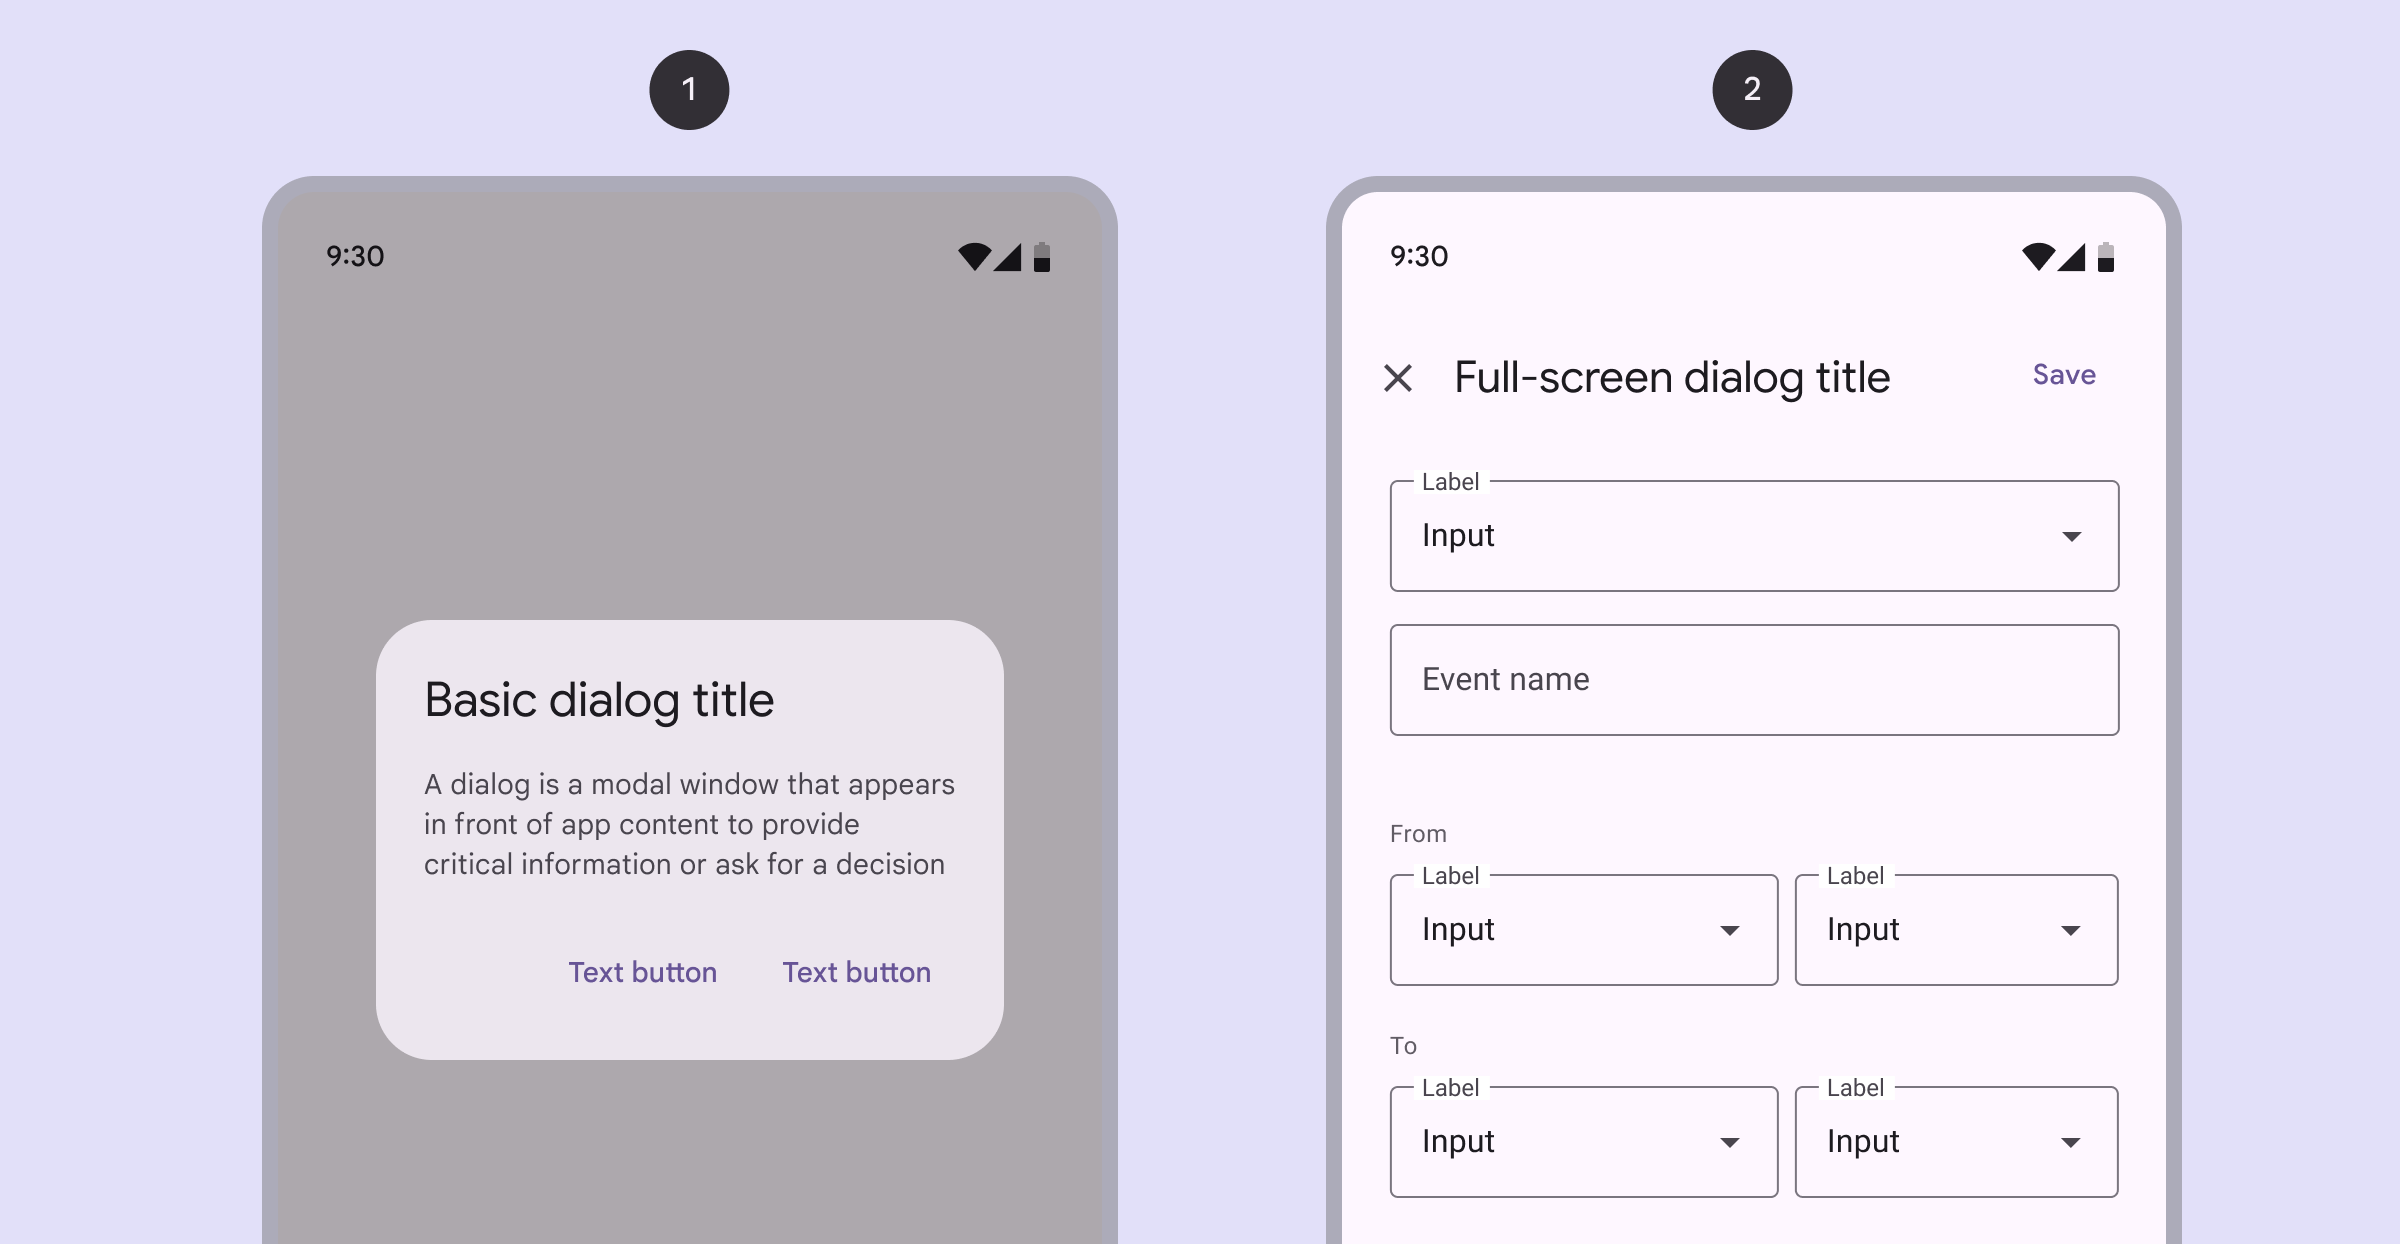
New HTML <dialog> tag: An absolute game changer

HTML will never be the same with the new <dialog> tag.

❌Before:

See how much work it would have taken me to create a dialog 👇

Almost 20 lines of CSS alone:

And that’s just CSS for the dialog functionality — it will still look very basic:

But how about with the new <dialog> tag!

✅ Now:

HTML
<button id="open">Open</button> <dialog id="dialog"> ⚡Lighting strikes the earth 44 times every second! </dialog>
JavaScript
const dialog = document.getElementById('dialog'); const open = document.getElementById('open'); open.addEventListener('click', () => { dialog.showModal(); });

We can even use the show() method to show a non-modal dialog — less intrusive with no backdrop:

JavaScript
const dialog = document.getElementById('dialog'); const open = document.getElementById('open'); open.addEventListener('click', () => { dialog.show(); });

Dialogs have always been a powerful way to forcefully seize your user’s attention and slam information in their faces.

It’s been a staple feature of every UI design system from Material Design to Fluent Design.

But even as common as they are we always had to resort to third-party libraries or create custom components to use them.

And many of these libraries don’t even follow the official recommendations for usability & accessibility…

Example: pressing the Escape key should dismiss the dialog on the page — but this doesn’t happen for many custom dialogs.

So <dialog> changes all that.

Auto-open dialog

The open attribute keeps the dialog open from the moment you open the page:

HTML
<dialog id="dialog" open> Giraffes are much more likely to be struck by lightning than humans are. In fact, they're 30 times more likely </dialog>

Auto-close button

Yes, you could add close functionality with standard event listeners and the close() method:

JavaScript
const close = document.querySelector( '#dialog .close' ); close.addEventListener('click', () => { dialog.close(); });

But the built-in <dialog> makes this even easier — no JavaScript needed:

HTML
<dialog id="dialog"> ⚡Gain essential coding skills & knowledge at codingbeautydev.com <br /> <form method="dialog"> <button class="close">Close</button> </form> </dialog>

How to style <dialog> the right way

<dialog> has a special ::backdrop pseudo-element for styling the backdrop:

CSS
::backdrop { background-image: linear-gradient( 45deg, magenta, rebeccapurple, dodgerblue, green ); opacity: 0.75; }

Styling the main element is straightforward:

CSS
dialog { background-color: black; color: white; }

Final thoughts

With the new HTML <dialog> tag, creating modals and dialogs in our web apps has never been easier and faster.

How to write “natural” code everybody will love to read

The biggest reason we use languages like JavaScript and Python instead of Assembly is how much closer to natural language they are.

Or how much they CAN be!

Because sometimes we write code just for it to work without any care about demonstrating what we’re doing to other humans.

And then this backfires painfully down the line. Especially when one of those humans is your future self.

Parts of speech: back to basics

You know your code is natural when it resembles English as much as possible. Like an interesting, descriptive story.

It means you’ve intelligently made the entities and actions in the story to powerfully express the code flow from start to completion.

Nouns

What entities are we talking about?

  • Variables
  • Properties (getters & setters)
  • Classes & objects.
  • Modules

Every character has a name, so we describe them with expressive nouns and noun phrases.

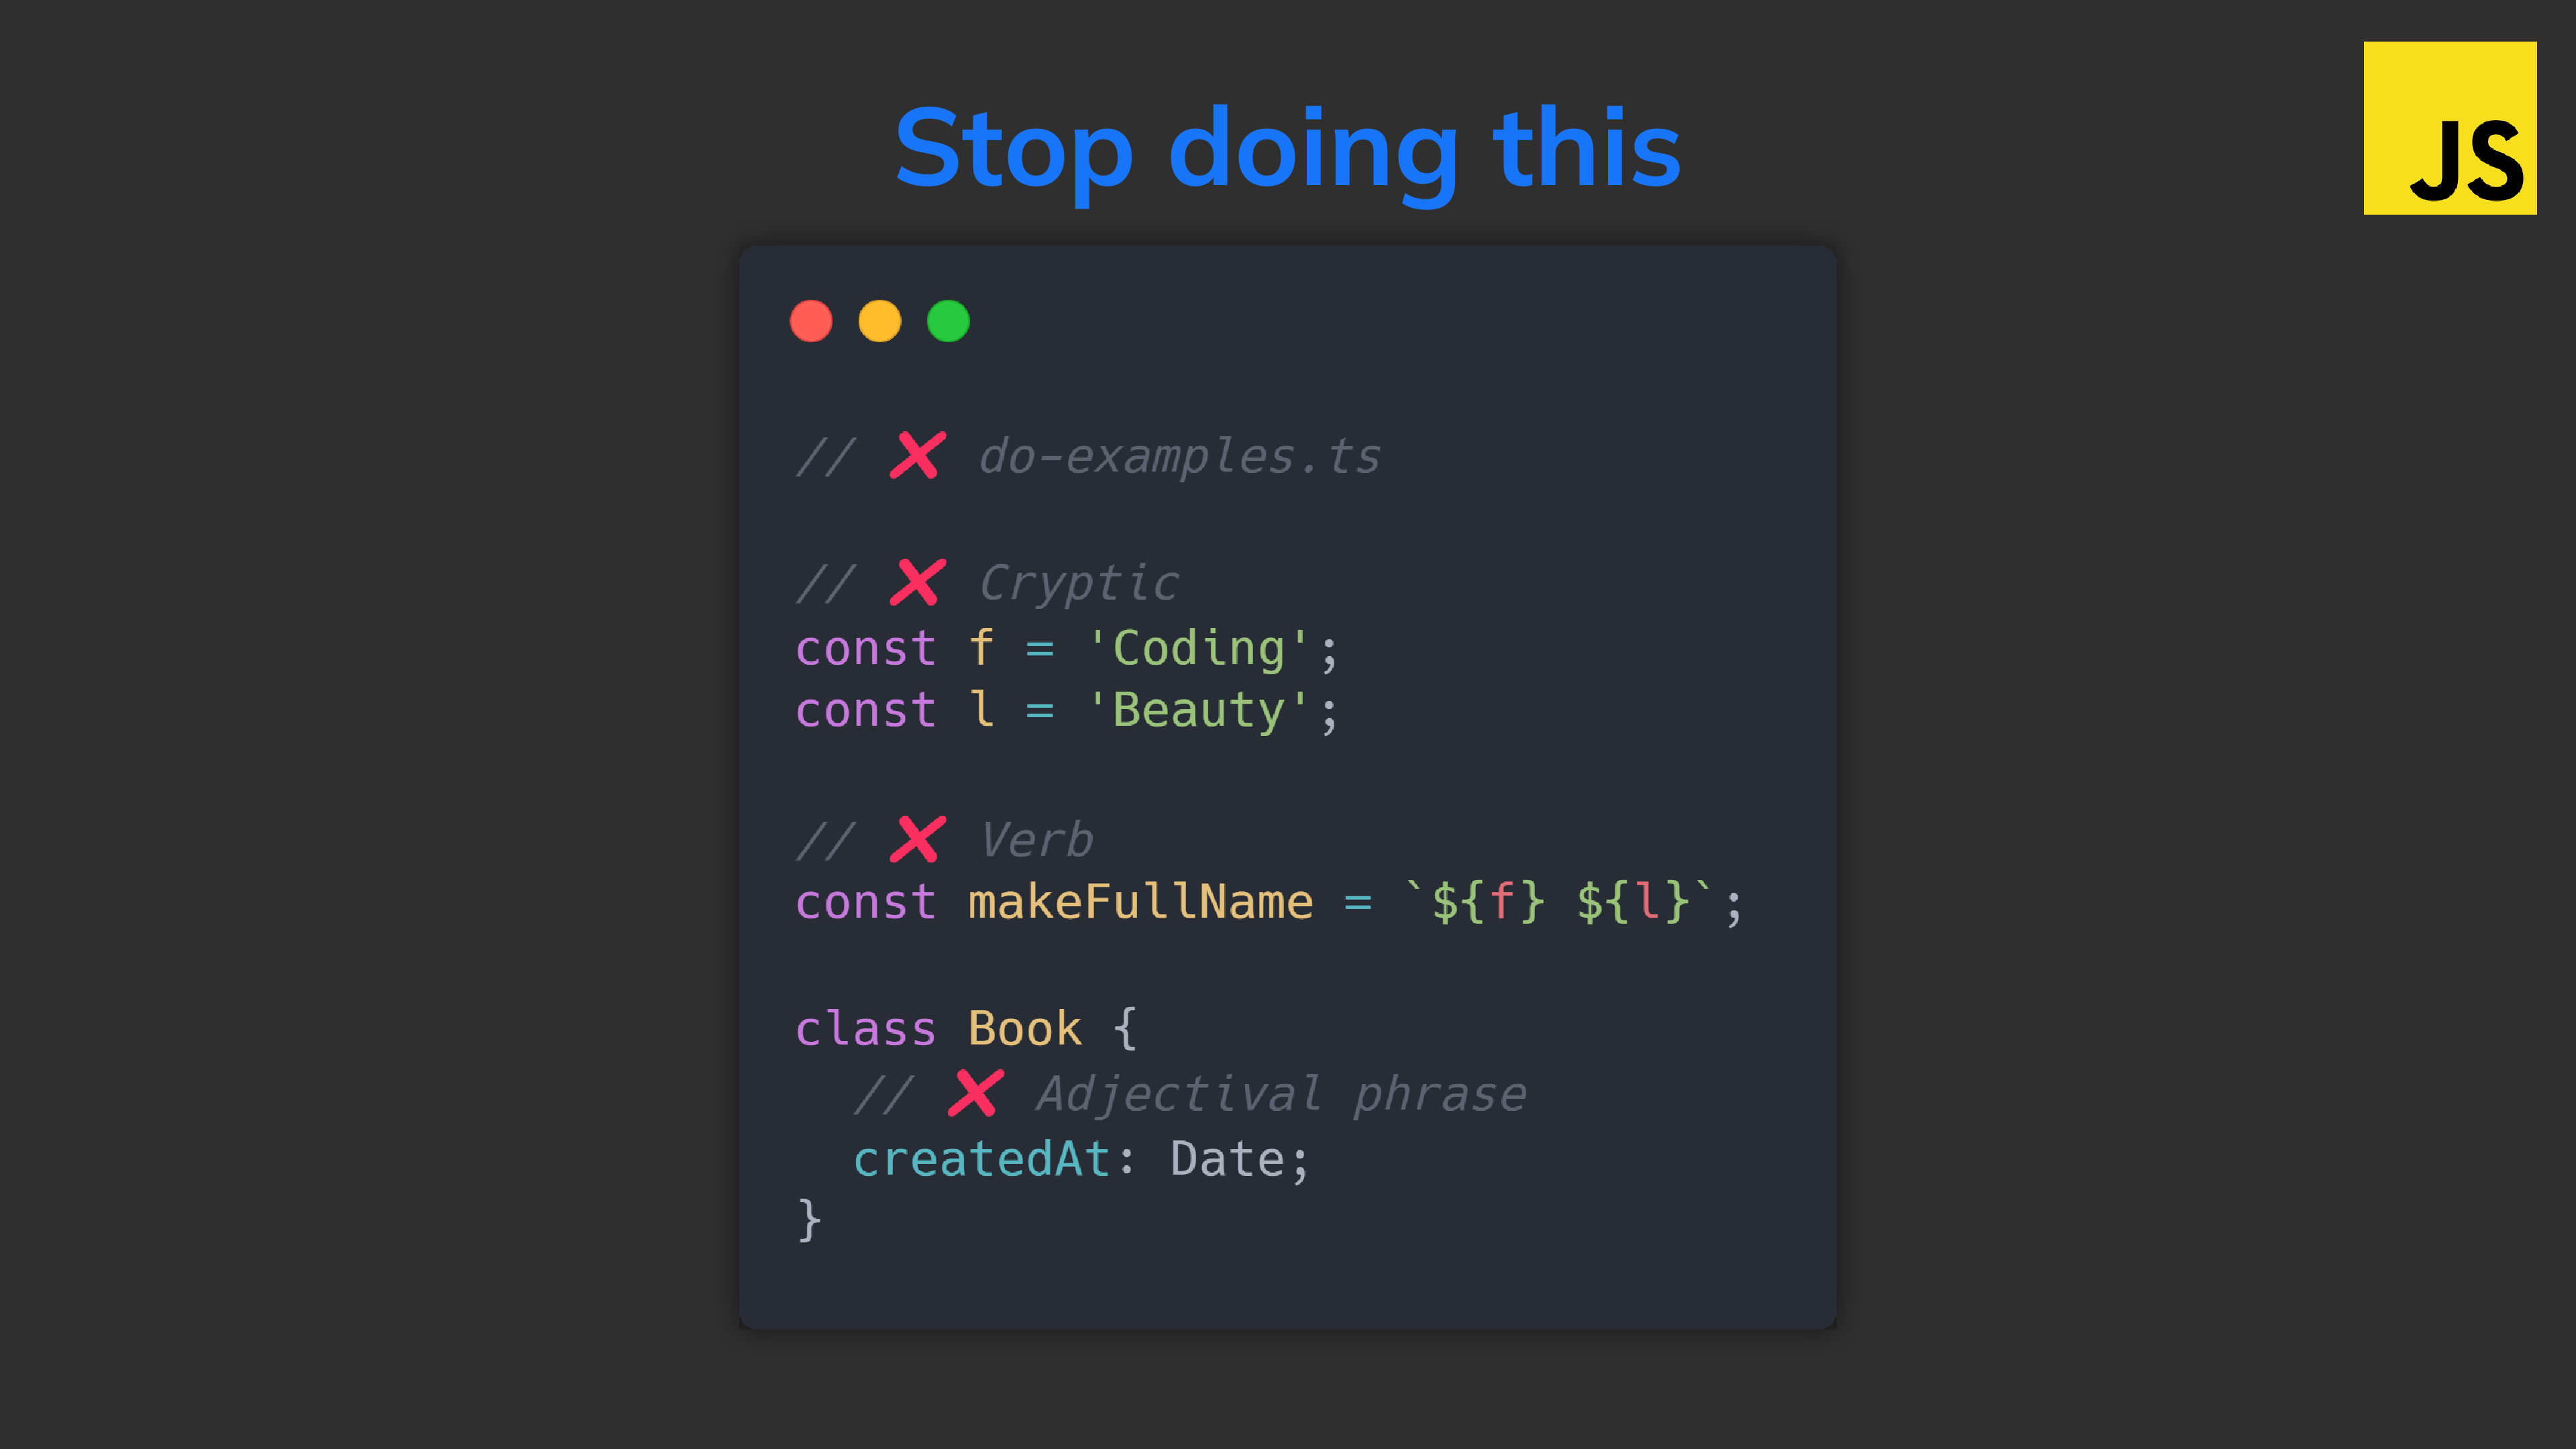
Not this:

JavaScript
// ❌ do-examples.ts // ❌ Cryptic const f = 'Coding'; const l = 'Beauty'; // ❌ Verb const makeFullName = `${f} ${l}`; class Book { // ❌ Adjectival phrase createdAt: Date; }

But this:

JavaScript
// ✅ examples.ts // ✅ Readable const firstName = 'Coding'; const lastName = 'Beauty'; // ✅ Noun const fullName = `${firstName} ${lastName}`; class Book { // ✅ Noun phrase dateCreated: Date; }

Verbs

What are the actions in your codebase?

  • Functions
  • Object methods

An action means an entity is doing something; the naturally way to name them is with descriptive verbs and verb phrases.

Not this:

JavaScript
class Product { constructor(name, price, quantity) { this.name = name; this.price = price; this.quantity = quantity; } // ❌ Noun total() { return this.price * this.quantity; } } const product = new Product('Pineapple🍍', 5, 8); console.log(product.total()); // 40

But this:

JavaScript
class Product { constructor(name, price, quantity) { this.name = name; this.price = price; this.quantity = quantity; } // ✅ Verb getTotal() { return this.price * this.quantity; } } const product = new Product('Banana🍌', 7, 7); console.log(product.getTotal()); // 49

Methods are for doing something. Properties are for having something.

So better still:

JavaScript
class Product { constructor(name, price, quantity) { this.name = name; this.price = price; this.quantity = quantity; } get total() { return this.price * this.quantity; } } const product = new Product('Orange🍊', 7, 10); console.log(product.total); // 70

Adverbs

Remember an adverb tells you more about a noun or verb or another adverb.

In JavaScript this is any function that takes function and returns another: a higher-order function. They upgrade the function.

So instead of this:

JavaScript
// ❌ Verb function silence(fn) { try { return fn(); } catch (error) { return null; } } const getFileContents = (filePath) => silence(() => fs.readFileSync(filePath, 'utf8'));

It’ll be more natural to do this:

JavaScript
// ✅ Adverb function silently({ fn }) { // or "withSilence" try { return fn(); } catch (error) { return null; } } const getFileContents = (filePath) => silently({ fn: () => fs.readFileSync(filePath, 'utf8') });

It’s like saying, “Get the file contents silently“.

Natural inputs

Coding and computing are all about processing some input to produce output.

And in natural code the processing is action and the input + output are entities.

Let’s say we have a function that calculates a rectangle’s area and multiplies it by some amount.

Can you see the problem here?

JavaScript
const area = calculateArea(2, 5, 10); // 100

Which argument is the width and height? Which is the multiplier?

This code doesn’t read naturally; In English we always specify objects of an action.

How to fix this? Named arguments:

JavaScript
// Inputs are entities - nouns✅ const area = calculateArea({ multiplier: 2, height: 5, width: 10 }); function calculateArea({ multiplier, height, width }) { return multiplier * height * width; }

This is far easier to read; we instantly understand what inputs we’re dealing with.

Even when there’s just 1 argument I recommend using this.

Natural outputs

And we can be just as explicit in our outputs:

JavaScript
const { area } = calculateArea({ multiplier: 2, height: 5, width: 10, }); function calculateArea({ multiplier, height, width }) { return { area: multiplier * height * width }; }

Which also allows us easily upgrade the function later:

JavaScript
const { area, perimeter } = calculateArea({ multiplier: 2, height: 5, width: 10, }); console.log(area, perimeter); // 100 60 function calculateArea({ multiplier, height, width }) { return { area: multiplier * height * width, perimeter: (height + width) * 2 * multiplier, }; }

There’s no time for magic

Coding isn’t a mystery thriller! It’s a descriptive essay; be as descriptive as possible.

Not this cryptic mess:

JavaScript
function c(a) { return a / 13490190; } const b = c(40075); console.log(p); // 0.002970677210624906

What do all those numbers and variables mean in the bigger picture of the codebase? What do they tell us – the human?

Nothing. They tell us nothing. The entity & action names are either non-existent or of terrible quality.

It’s like telling your friend:

Yeah I went to this place and did this thing, then I did something to go to this other place and did something of 120!.

This is nonsense.

Natural code describes everything. Nice nouns for entities, great verbs for the actions.

JavaScript
const speedstersSpeedKmPerHr = 13490190; const earthCircumferenceKm = 40075; function calculateSpeedstersTime(distance) { return distance / speedstersSpeedKmPerHr; } const time = calculateSpeedstersTime(earthCircumferenceKm); console.log(time); // 0.002970677210624906 ~ 11s

Now you’ve said something.

Yeah I went to the restaurant and ate a chicken sandwich, then I drove to the gym and did bicep curls of 120 pounds!.

Create “useless” variables

Variables in natural code are no longer just for storing values here and there.

They’re also tools to explain what you’re doing:

That’s why instead of doing this:

JavaScript
if ( !user.isBanned && user.pricing === 'premium' && user.isSubscribedTo(channel) ) { console.log('Playing video...'); }

We’ll do this:

JavaScript
const canUserWatchVideo = !user.isBanned && user.pricing === 'premium' && user.isSubscribedTo(channel); if (canUserWatchVideo) { console.log('Playing video...'); }

We’re going to use the variable only once but it doesn’t matter. It’s not a functional variable but a cosmetic variable; a natural variable.

Final thoughts

Code is for your fellow humans too, not just compilers.

Can someone who doesn’t know how to code understand what’s going on in your code?

This is no doubt a powerful guiding question to keep your code as readable an natural as possible.